You will be using different brushes for different jobs; learn how to quickly pick the desired tool. There are also two basic parameters in each digital brush that you will be changing very often: brush size (diameter) and brush opacity. Infinite Painter offers a couple of ways for adjusting these parameters. Pick your favorite method.
Brush selector
Pick your favorite tool here
In any brush mode tap the active icon once again to select brushes.
Brush selector panel — basic elements
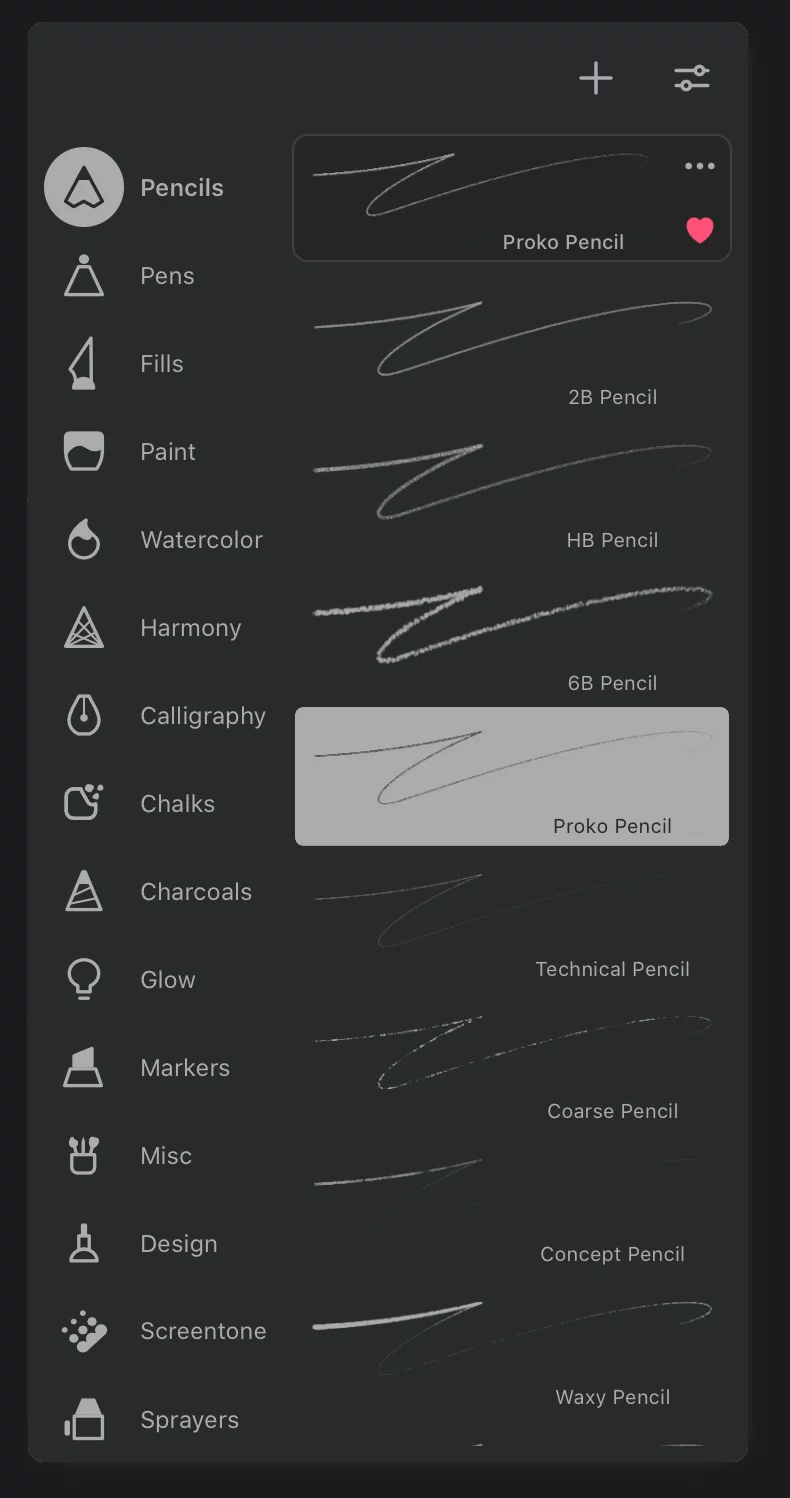
Current folder
Current brush preview
With buttons for the basic brush management.
Current brush
selected within the current folder.
List of brush folders
Scroll down for more. See the List of built-in brushes for reference.
Tap on the folder icon to open.
List of brushes in current folder
Tab a brush thumbnail to select this brush for painting (in current Brush modeBrush modeOne of the three main ways the brushes in Infinite Painter work: in the Paint mode the brush applies the color, in the Blend mode it blends or smears existing colors on the canvas, and in the Erase mode it removes the color. Technically, the Cloning is actually a brush mode too.Learn more).
You may have different brush selected for each modeBrush modeOne of the three main ways the brushes in Infinite Painter work: in the Paint mode the brush applies the color, in the Blend mode it blends or smears existing colors on the canvas, and in the Erase mode it removes the color. Technically, the Cloning is actually a brush mode too.Learn more or the same brush for all of them.
Brush selector reference
![]()
“New custom folder” button
(This is actually a button, not a folder). Tap to add a new, empty folder for brushes; see Brush management.
Special brush folders (besides the "regular" folders with the built-in brushes):
![]()
Recent brushes
Lists all the brushes you have used in the current project.
![]()
Favorite brushes
You can mark any brush as your favorite. All of them will be listed in this collection.
![]()
“Created” folder
Newly created brushes will land here. You may later move them to custom folders if you wish.
![]()
“Downloads” folder
Here you will find all the brushes downloaded from the web. Create or import a brush There are tons of them on the web. More in Adding new brushes.
A custom brush folder
You can have as many of them as you need.
(Note that the custom folders are marked with the first two characters of their name.)
![]()
Create or import a brush
There are tons of them on the web. More in Adding new brushes.
![]()
Edit current brush
Opens a powerful brush editor panel. Detailed description in Brush Editor.
![]()
Current brush options
Tap to open the popup menu.
![]()
Add the brush to your Favorites
Brushes marked as "favorite" are listed in the Favorites special folder. Note that the Favorites set are separate for each brush mode (Paint, Blend, Erase).
Reset the brush
Feel free to experiment with brush editing; you can always return a brush to its ‘factory settings’.
![]()
![]()
Note that the Favorites and Recent "folders" are created and updated automatically. They also only list "shortcuts" to the actual brushes; the “real” brushes stay in their original locations. Removing a brush from Favorites or Recents does not affect the actual brush.
The Favorites folder on first use may contain a couple of good brushes for you to test.
Brush collection management
You can reorganize the default (built-in) brushes, create new ones or download them from the web. Learn more in Brush management.
Quick brush size adjustments
Virtual sliders.
To adjust the size (diameter) of the current brush slide up or down from the Size button.
Watch the on-screen live indicator showing the changing size.
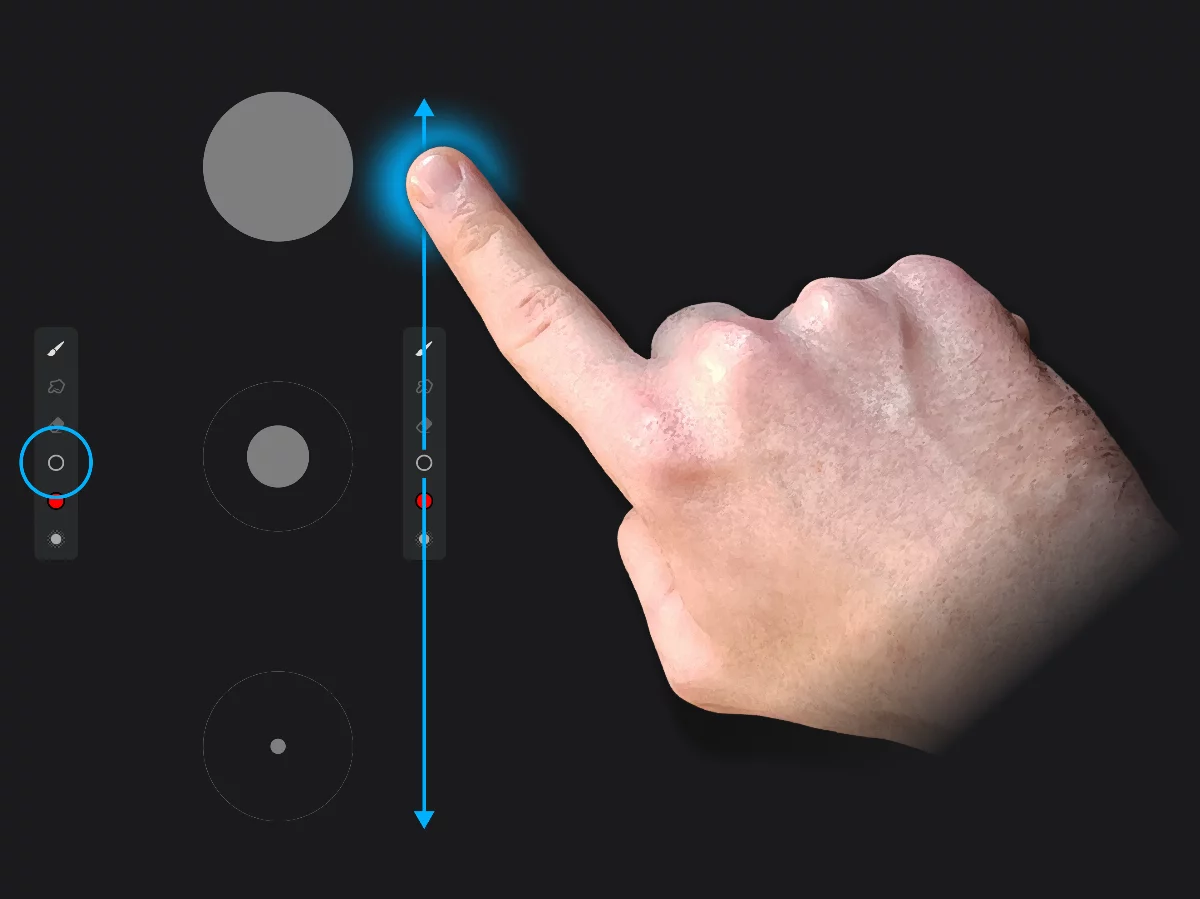
There are other ways to adjust the brush size. See below.
Quick brush opacity adjustments
Virtual sliders.
To adjust the opacity of the current brush slide up or down from the Opacity button.
Watch the on-screen live indicator showing the changing opacity.
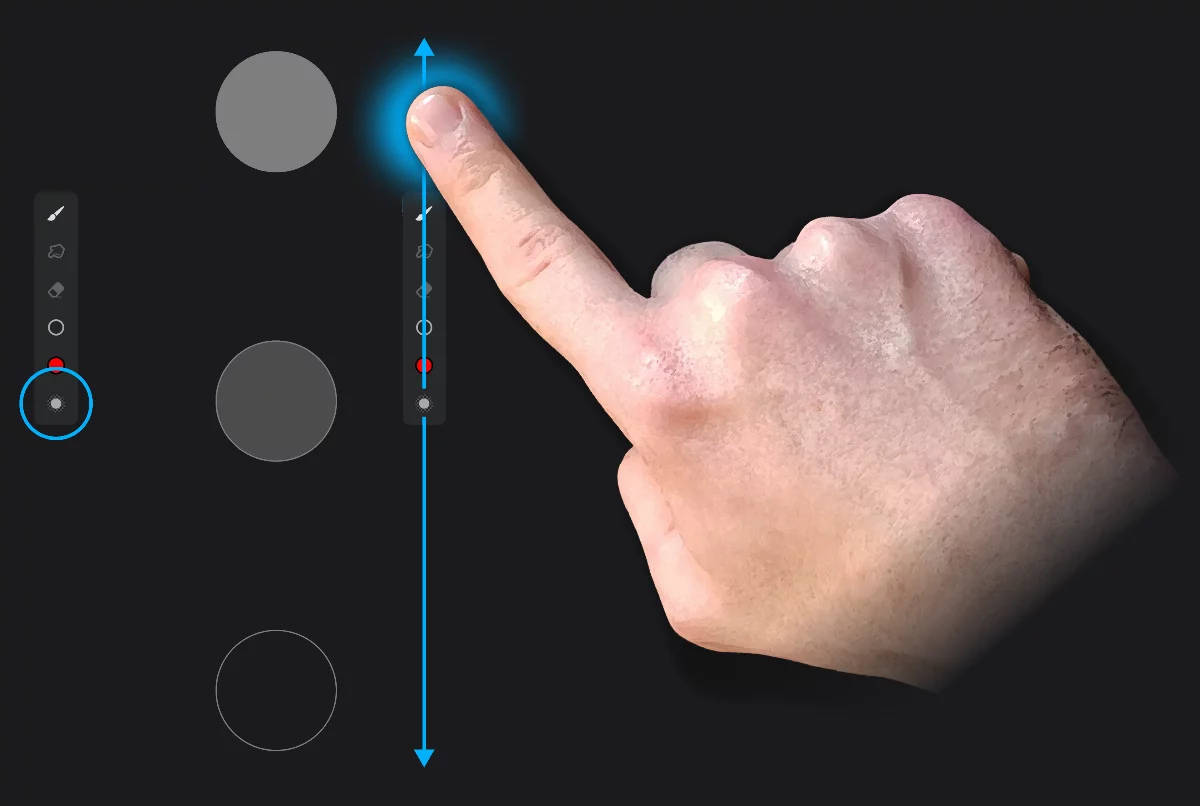
Full opacity
Current opacity
Zero opacity
(the brush will not apply color)
There are other ways to adjust the brush opacity. See Brush — basic adjustments.
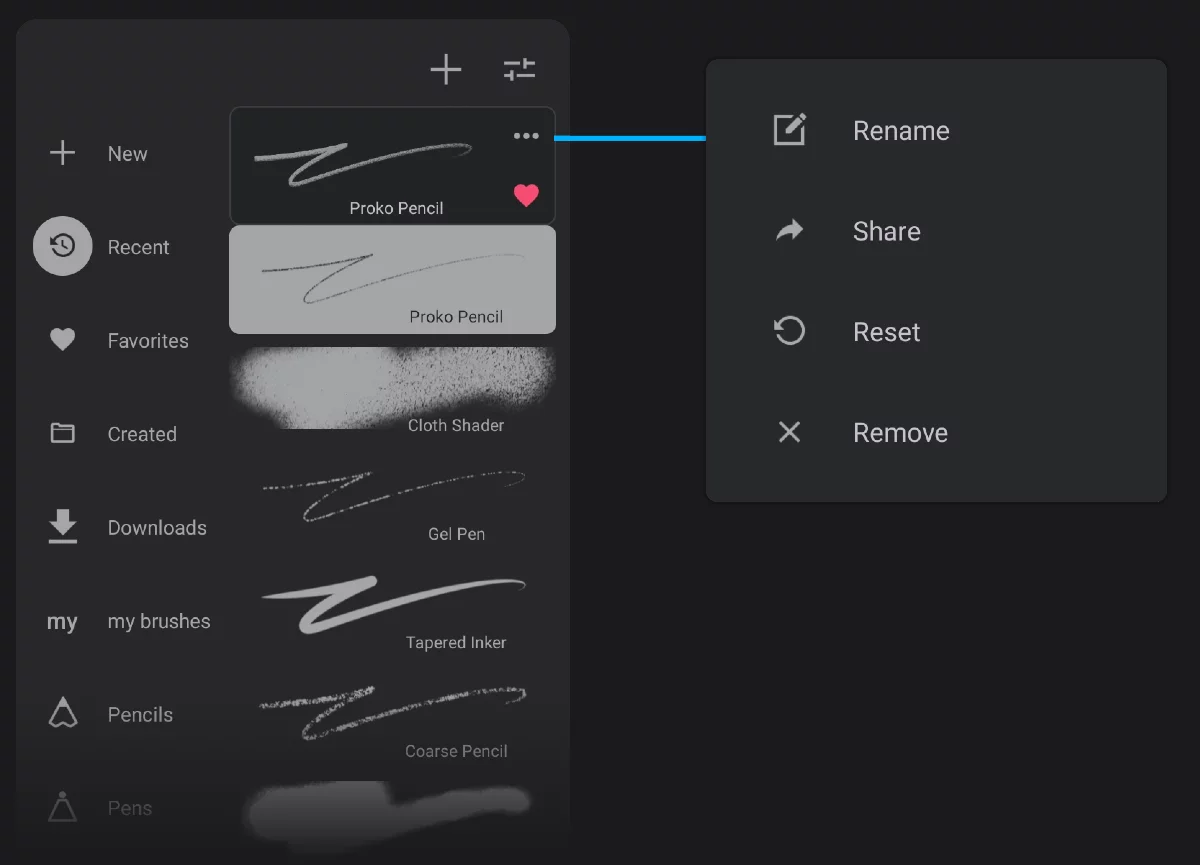
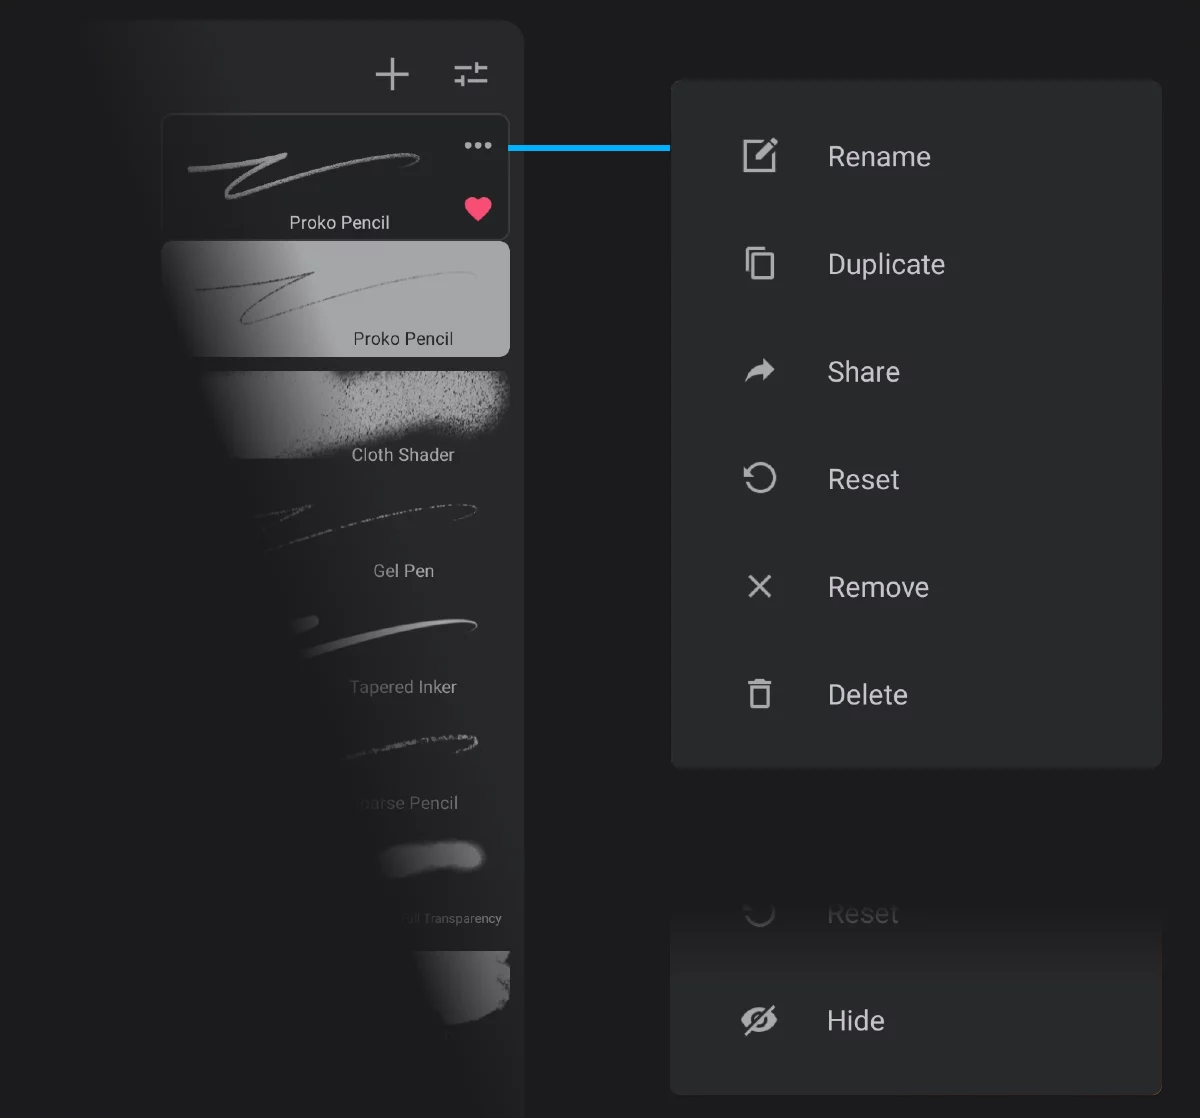
Brush options menu
For basic brush management.
Brush selector panel
![]()
Rename
You can change the name of each brush, including the built-in brushes.
Note that this does not create a duplicate, only changes the displayed name of the current brush. For default brushes you can restore the original name at any time.
![]()
Duplicate
This actually creates a copy of current brush. Be sure to rename it so you can find it later. Duplicated brushes “remember” their parent brush.
![]()
Share
Allows you to export the brushes you created (for example to share them with other users). Exported brushes are saved in proprietary .prbr file format.
![]()
Reset the brush
Feel free to experiment; you can always return to factory settings.
![]()
Remove
This removes the current brush from the current folder. For a custom brush it returns it to the “Created” folder. Note that removing a brush from Favorites does not change the location of the brush.
![]()
Delete
This actually deletes the current brush.
Be careful, this is irreversible for custom brushes.
![]()
Hide
For the default (built-in) brushes this replaces the “Delete” command: these brushes cannot be deleted for good.
The contents of the options menu may differ for certain brushes and certain folders.
Brush — basic adjustments
These are the ‘everyday’ brush controls. There is way more.
For quick adjustments of the current brush, tap on one of buttons on the main toolbar: Size or Opacity. Note that these buttons also serve as “virtual sliders” for quick adjustments of the two parameters (as described above).
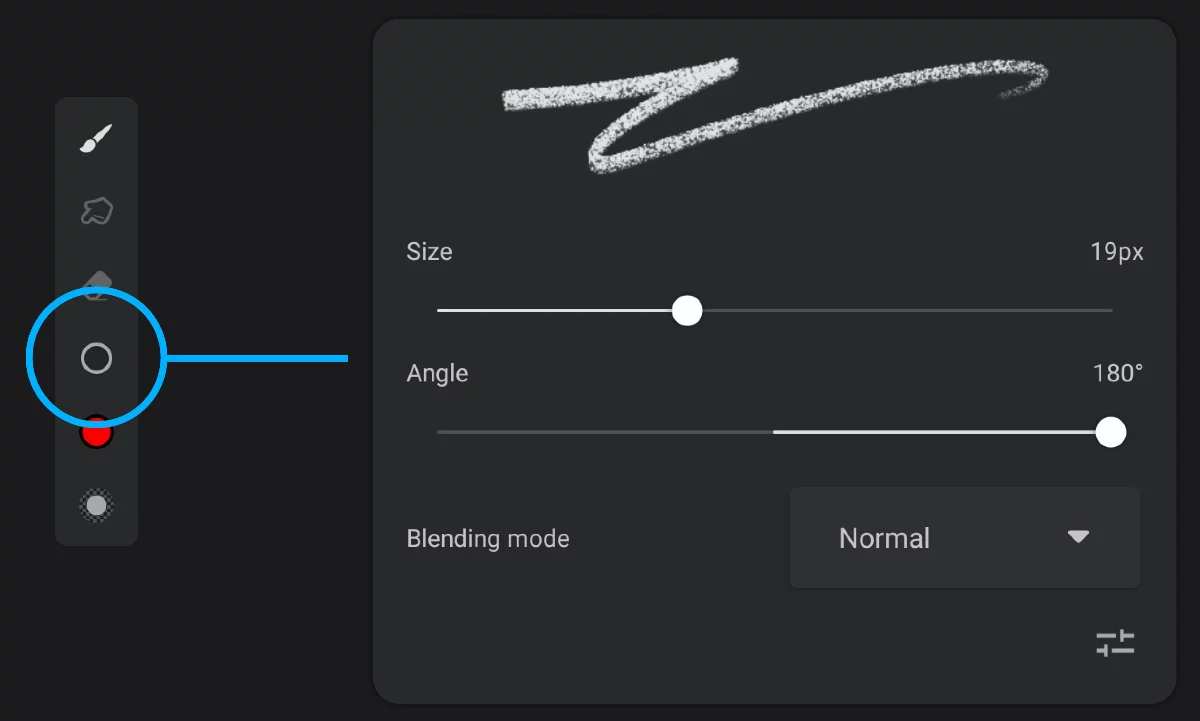
Brush Size button/indicator
(tap to open the popup panel)
Brush live preview
Brush Size slider
Set the brush size precisely.
Brush Angle slider
Controls brush head angle.
Color blending mode
Affects how the brush color interacts with existing colors. Learn more about color blending modes in Layer blending modes.
Brush Editor
Opens the powerful Brush Editor panel with a hundred of parameters. Learn how to use Brush Editor in Brush Editor.
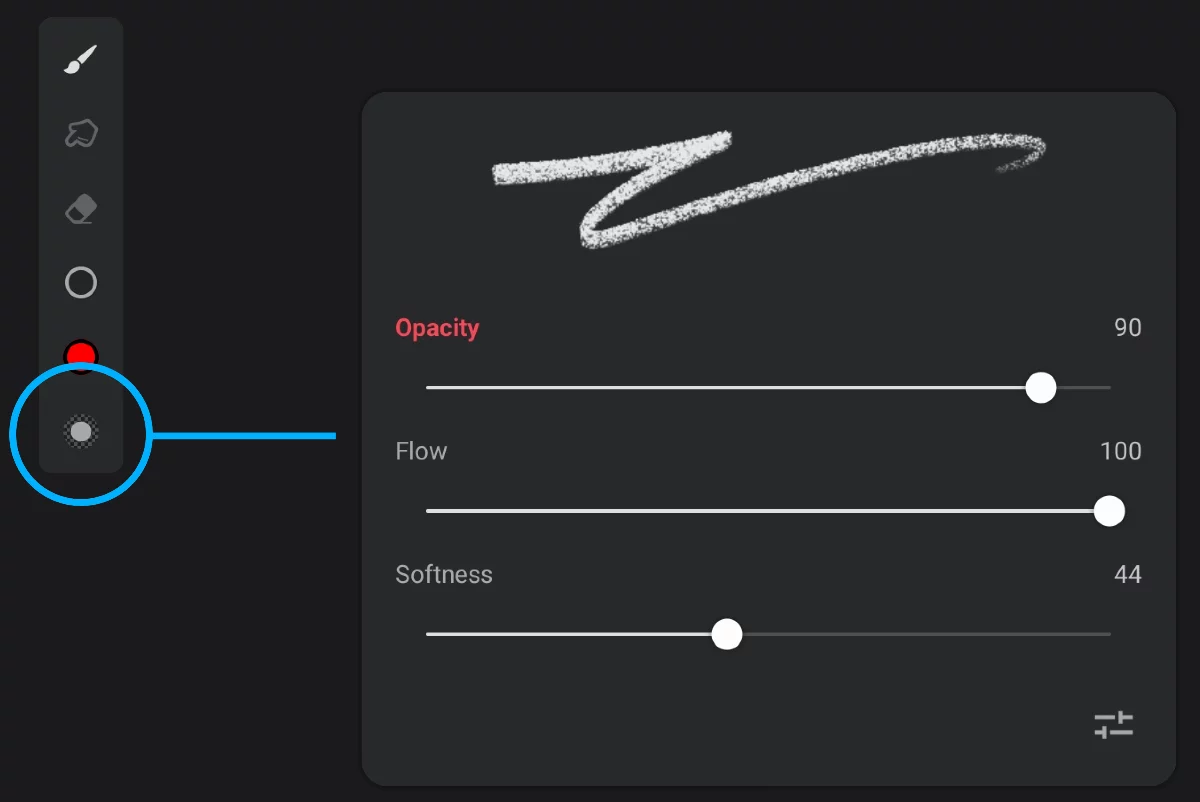
Brush Opacity button/indicator
(tap to open the popup panel)
Brush live preview
Brush Opacity slider
Controls opacityOpacityMeasure of how much a layer (or a pixel on a layer) obscures the background. Zero opacity means full transparency; 100% opacity means that no background is visible. of the brush stroke.
Flow slider
Controls opacity of each brush “stamp” along the stroke.
Softness slider
Blurs the edges of the brush head.
You can re-assign the Opacity gesture controls to Flow or Softness parameter. Just tap on the name of the parameter you want (it will be highlighted).
The highlighted parameter (Opacity, Flow or Softness) will then be controlled by both the virtual slider on the main toolbar and with the horizontal three-finger drag gesture.
See Quick brush opacity adjustments and Adjust the brush opacity with a gesture.
All the brush parameters that have been changed in the described panels are immediately saved to the current brush definition when you dismiss the panel. There is no “undo” function for that (however you can reset the brush to its factory state, if need be).
Note that there are faster ways to adjust these basic parameters — see Quick brush size adjustments and Quick brush opacity adjustments.
![]()
If you are using a physical keyboard, press [ (left square bracket) key to decrease, and ] (right square bracket) to increase the brush size.