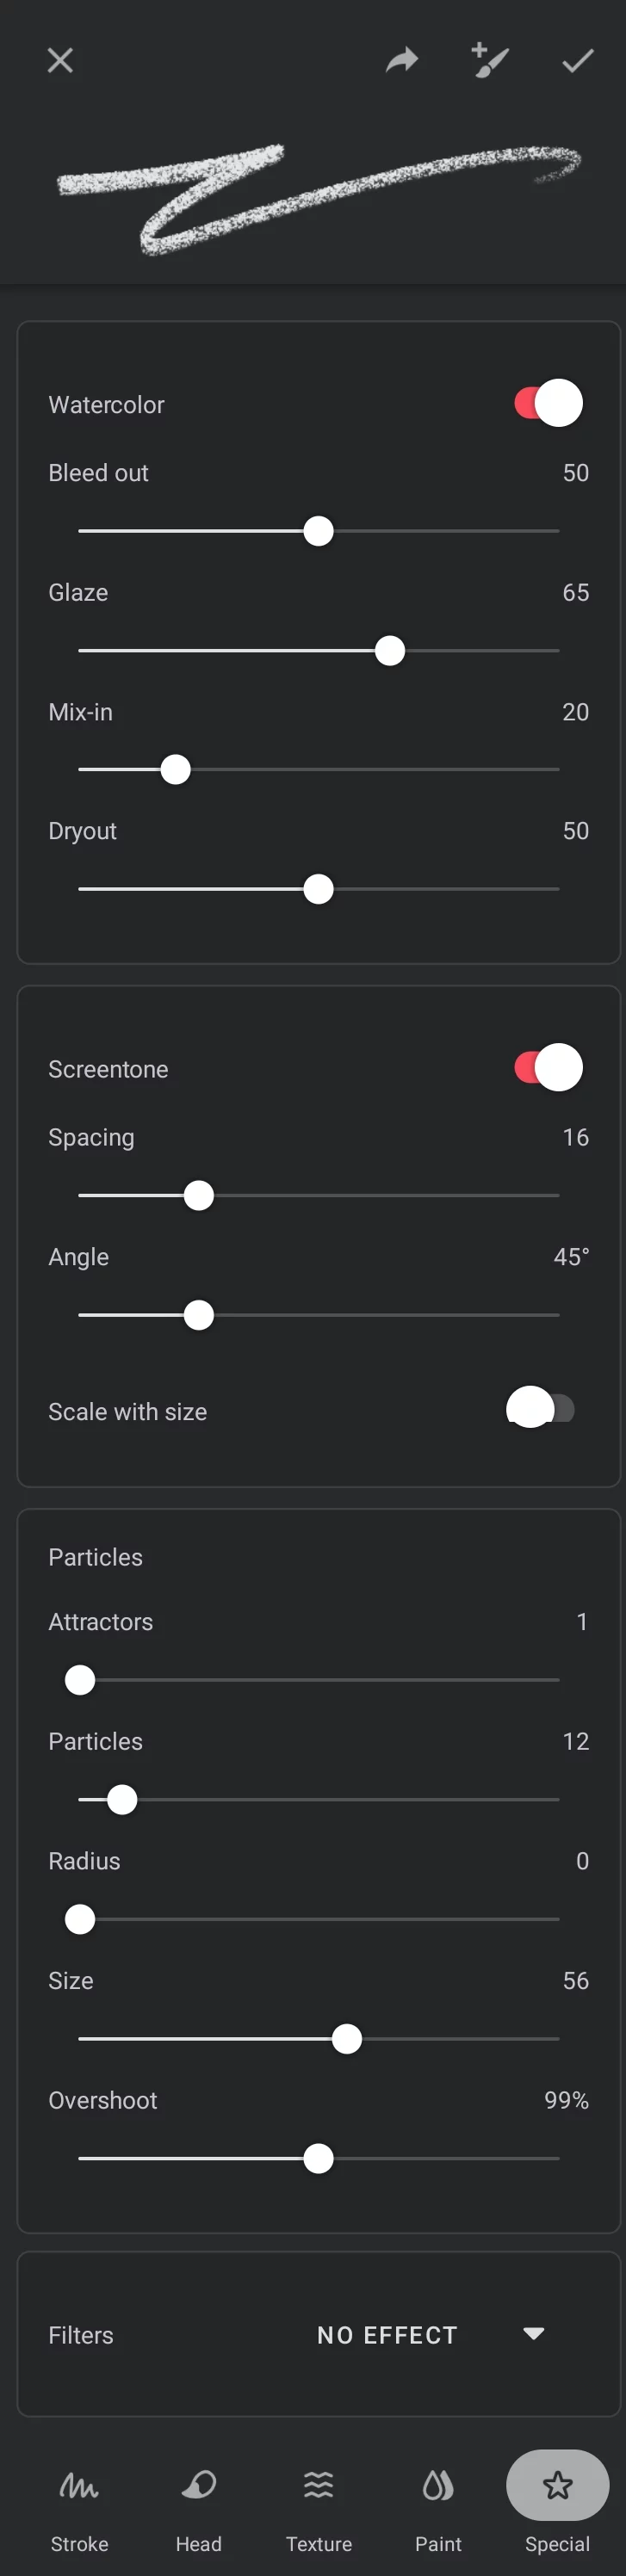
Brush Editor — Special tab overview
Special effects, from watercolor to photographic filters.
The controls in this tab relate to special effects added to the brush. The controls are grouped in separate sections for each special effect. If given effect is not applied to the current brush, its section is collapsed.
Not all effect sections may be accessible for each brush.
Some of the effects may not be mixed with others. For certain special brushes (like Harmony or Fill brushes), the special effects will not alter the behavior of the brush or the effect may be unexpected.
Watercolor effect
Adds watercolor effects to the brush.
Learn how to use this effect in Watercolor effects section.
Screentone effect
Adds a screentone effect to the brush.
Learn how to use this effect in Screentone effects section
Particles effect
Adds a particle cloud effect to the brush.
Learn how to use this effect in Particle effects section
Note that the Particles section is not displayed in “regular” brushes, so you cannot just add this effect to any brush. You can however duplicate an existing Particle brush and modify it to your liking. This is similar for the Harmony brushes that also can only be created by duplicating the existing ones.
Refer to the List of built-in brushes where you can find brushes with these effects.
Brush filters and color adjustments
A huge collection of filter effects and color adjustment functions that can be added to the brush.
Lean how to use brush filers and adjustments in Brush filters and color adjustments
Brush effects
There are three “brush effects” in Infinite Painter:
Besides that, you can apply one of a number of filters and color adjustments to the brush for a huge range of cool visual effects.
See: Brush filters and color adjustments
There are also two separate classes of procedural brushes that have completely different internal construction:
Harmony brushes
These brushes do not use the regular brush heads and they may not accept all the special effects too.
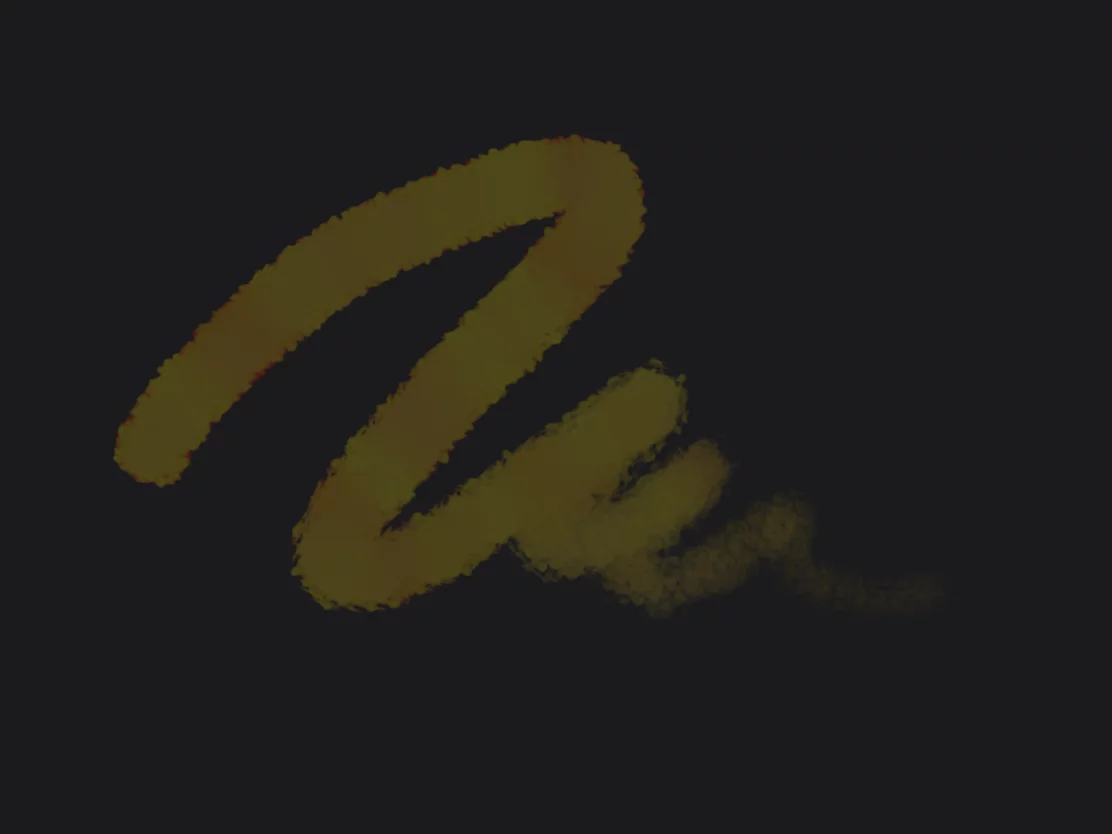
Watercolor effects
Almost like real.
Watercolor effects, well, mimic real watercolor effects. Only without water.
Example of the watercolor effect in a brush stroke:
Watercolor effect controls (in the Special tab of the Brush Editor):
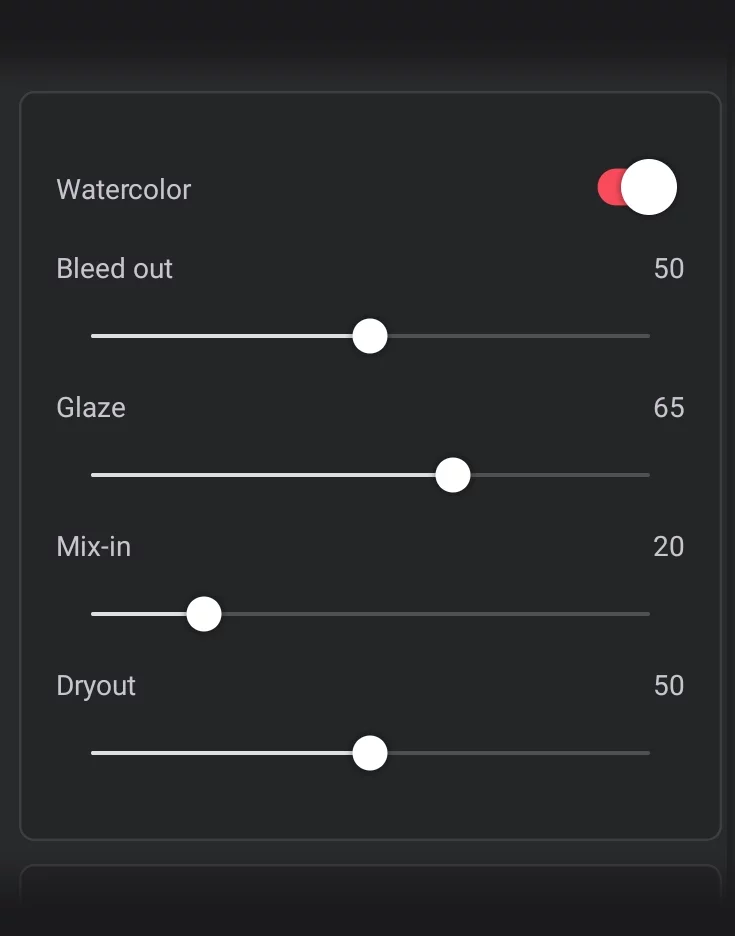
Watercolor (switch)
— enables the watercolor effect in the brush and activates the following controls.
Bleed out
Controls the amount of spreading of the stroke.
Glaze
Here it works as amount of water in real watercolors. Do not confuse with the “glaze” parameter found in the Head controls.
Mix-in
Controls how the brush stroke interacts with underlying colors.
Dryout
Controls how fast the watercolor spreading fades out.
![]()
Note that there is a whole brush category "Watercolor" among the Built-in brushes .
Watercolor effects may look differently when applied to empty (transparent) layer and when applied over a solid color.
Screentone effects
Manga-style raster fills and more.
Screentone snaps the brush head to a defined square grid. It is intended for creating pattern-style fills with a brush.
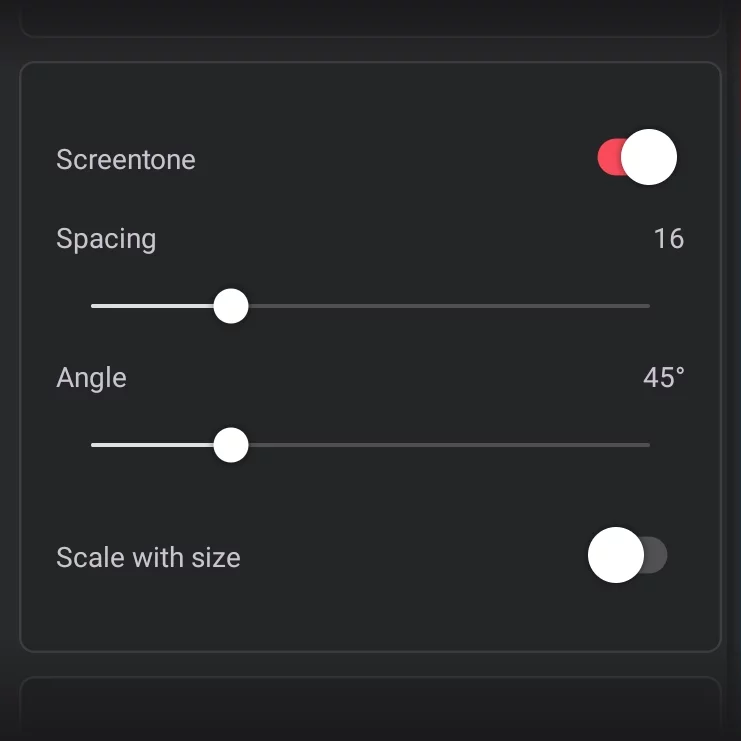
Screentone (switch)
Turns on the screentone effect for the current brush and activates the following controls.
Spacing
Defines the size of the snapping grid in pixels.
Angle (grid angle)
The angle of the grid (0-180°).
Scale with size
Scales the screentone grid size along with the brush size (when the brush size is dynamically controlled).
Screentone effect
with custom brush head Size 64 px, Angle 45°; Dynamic brush size on.
![]()
Note that there is a whole brush category (folder) named "Screentone" (however not all brushes in it use the Screentone effect!)
Screentone may not work well with certain brushes (like the Harmony brushes, Watercolor brushes, Fill brushes etc.).
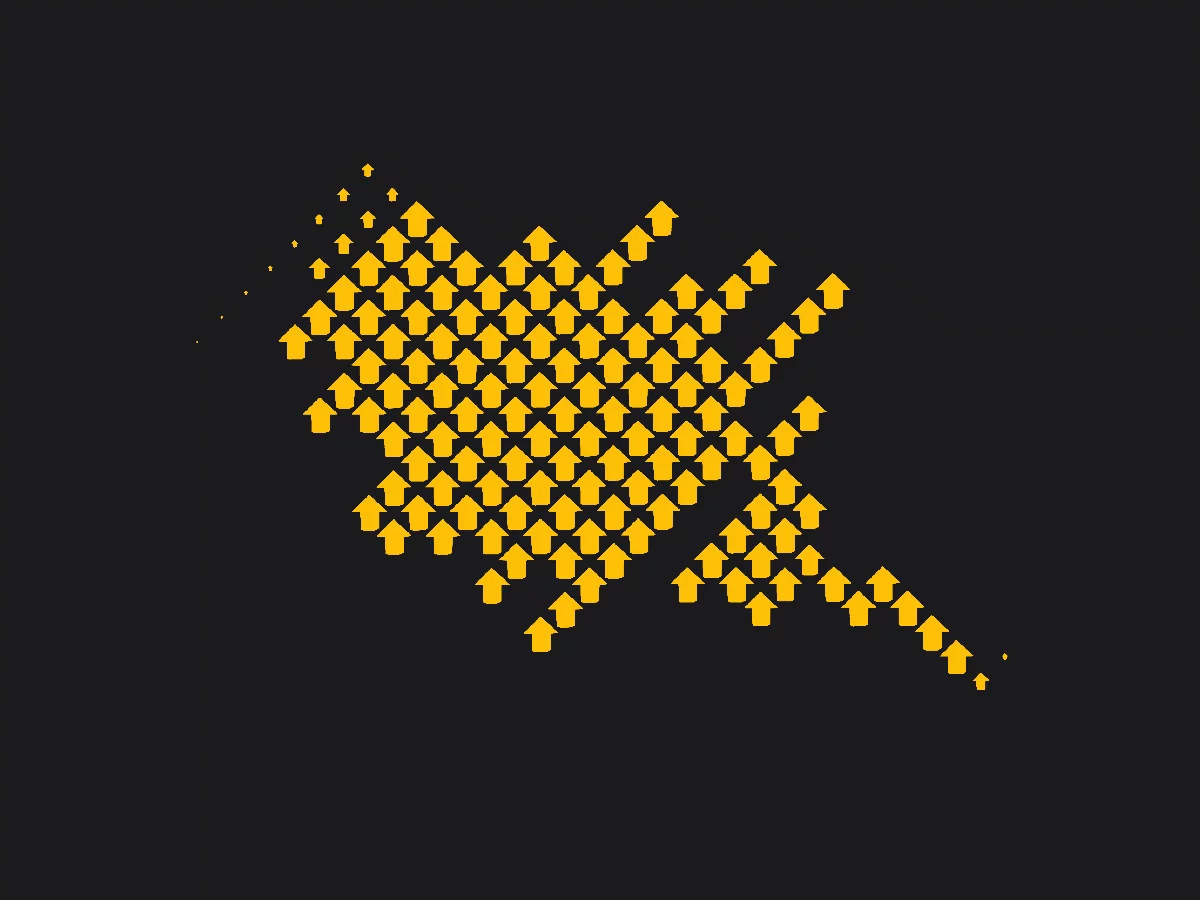
Particle effects
Use random particle systems for special effect brushes.
(Only for a few special particle brushes; like Splatter, Velocity Splatter, Sparkler, Stardust; also legacy brushes Svetlana and Pollock. See List of built-in brushes.)
Tip: Currently, you can create new particle brushes only by duplicating one of the default ones.
Particles effect controls (in the Special tab of the Brush Editor):
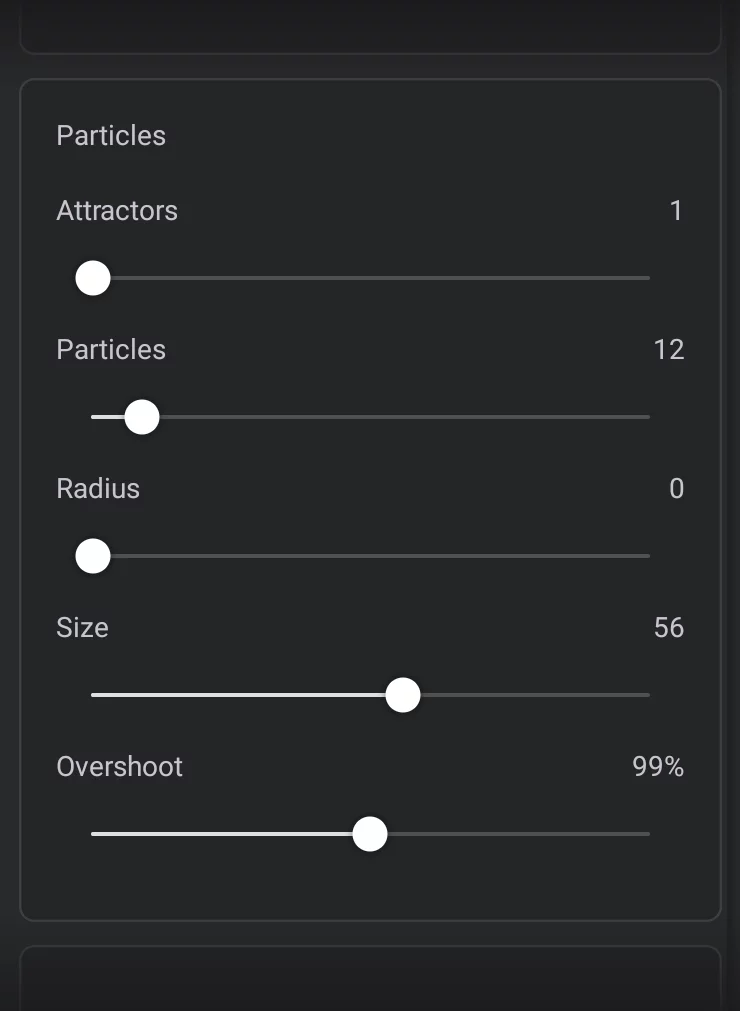
Attractors (1-64)
— number of the attractors. Attractors are the points that follow the stroke path and pull the particles. May be understood as tips of bristles of a real-world paintbrush. Attractors act like the brush head so they rotate and interact with the path just like the brush head does.
Particles (1-400)
— number of the particles assigned to the attractors. More particles means a heavier brush or more spattering.
Radius
The distance the attractors are set away from the stroke path. This is the apparent "brush size".
Particle Size (0.00-0.10)
— Defines the size of the particle in relation to the size of the brush.
Overshoot (0.00-2.00)
— Particles are pulled toward their attractor so this defines how much they can overshoot their attractor. This allows for spattering when making sharp turns with a stroke.
Note that this section has no on-off toggle like the Watercolor or Screentone effects. You cannot freely mix this effect with other settings of the brush (some of the settings won’t work, some may produce unexpected results). However do not hesitate to experiment; there is nothing that could be broken here.
Examples
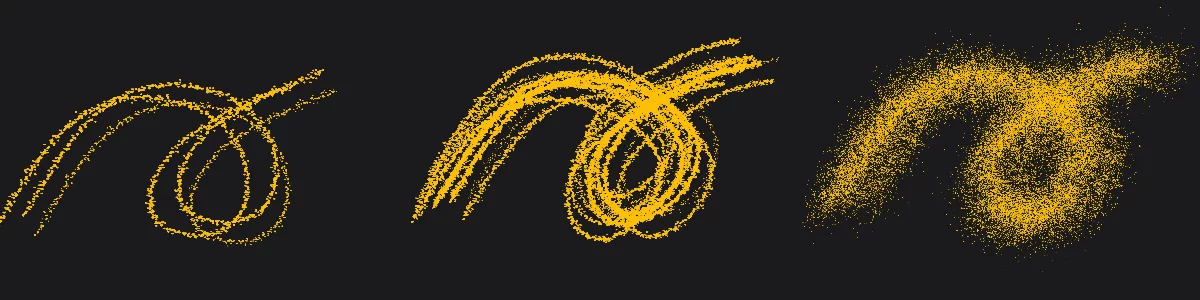
3 attractors, 3 particles
6 attractors, 12 particles
6 attractors, 100 particles, Scatter 20%
Defining the particle
Head tab, Source section
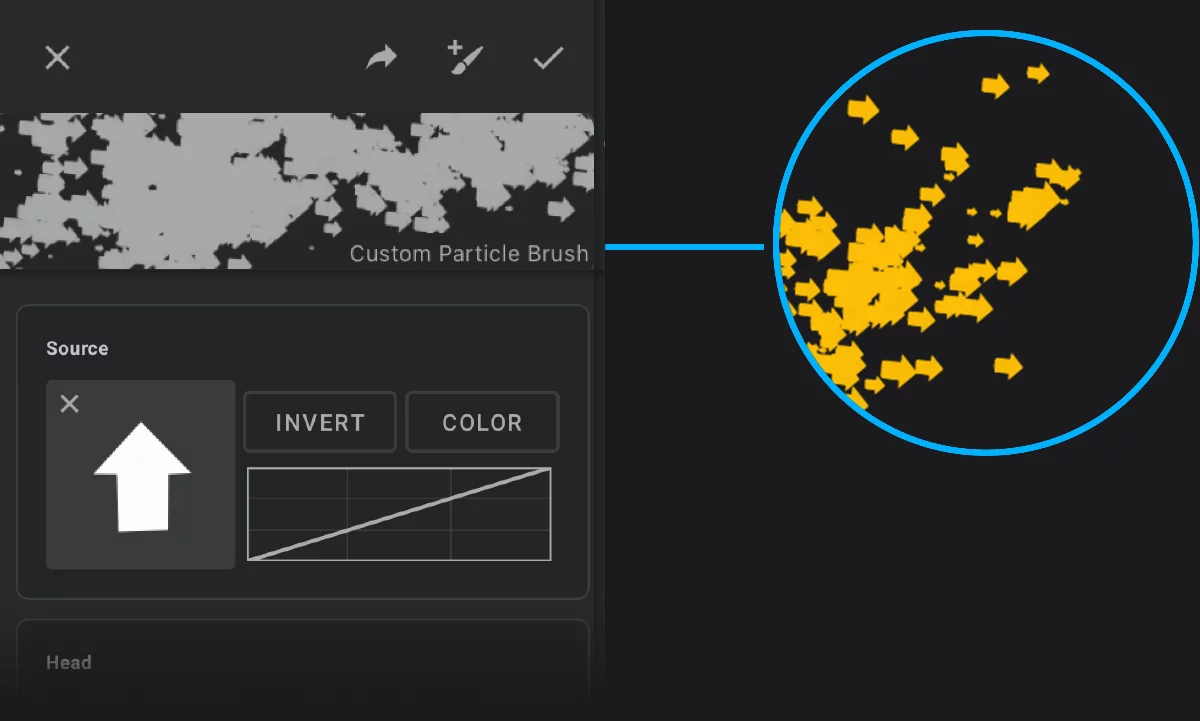
The particle is defined as the brush head. This can be any bitmap.
Note that not all of the regular brush settings work as usual in the Particle brushes. The “main” Size parameter controls the overall diameter of the particle system, not the size of each particle.
The particle cloud
The quality of rendering of the particles depends on the interaction of many parameters: particle size and radius, brush size, canvas size etc.
Randomness
Use the Continuous Jitter Scatter setting in the Head tab to adjust the amount of random spread of the particles. See Brush Editor — Head tab.
Other Jitter controls may affect the behavior of the particle systems; use them with caution.
Brush filters and color adjustments
A whole new world of special effects.
Add filters and color adjustments to the brush, in order to create specialized tools.
In fact, this makes a separate Brush modeBrush modeOne of the three main ways the brushes in Infinite Painter work: in the Paint mode the brush applies the color, in the Blend mode it blends or smears existing colors on the canvas, and in the Erase mode it removes the color. Technically, the Cloning is actually a brush mode too.Learn more, as the brushes with filters do not just paint.
The effect may be applied either to the active layer or to the brush stroke itself (however not both at the same time).
An example of a filter applied to the layer:
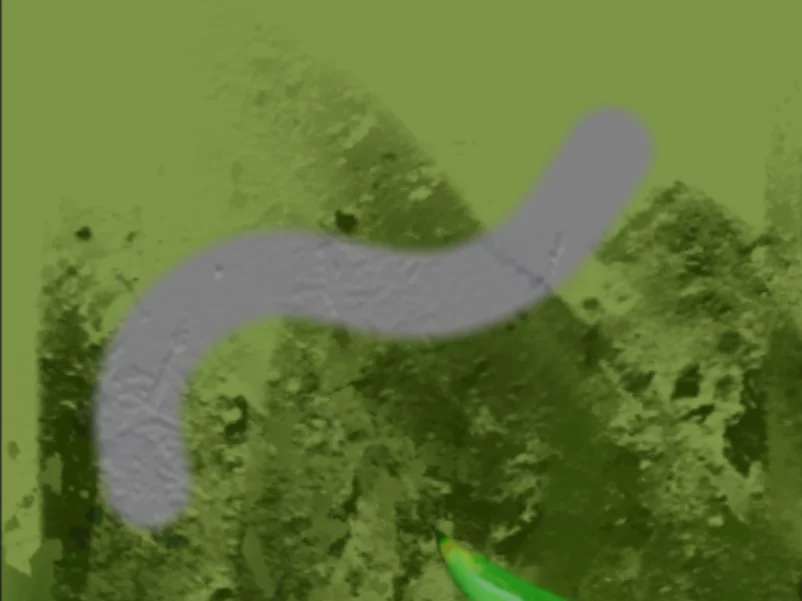
Here the Structure filter applies an impasto relief the already painted areas.
The same filter applied to the brush stroke:
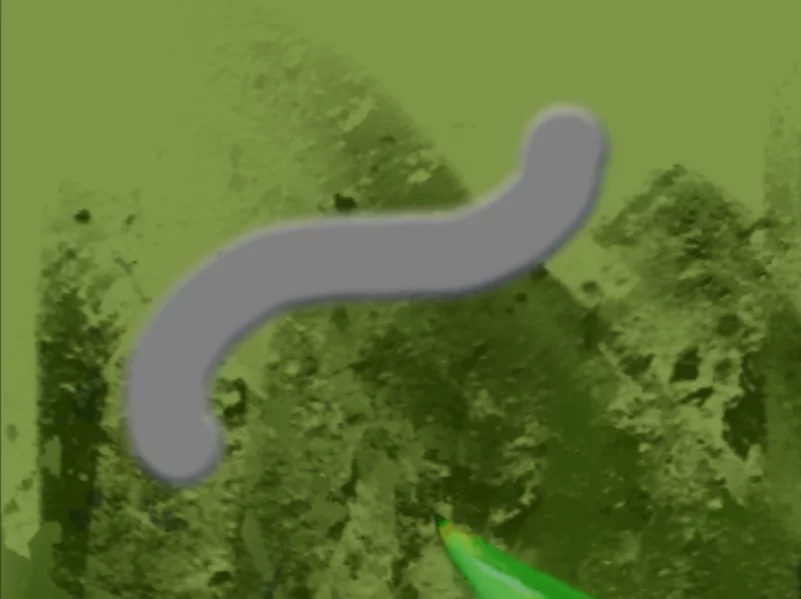
Now, the same Structure filter adds the impasto effect to the brush stroke itself, ignoring the artwork.
Note that the Structure filter behaves differently that the in-built Structure “feature” of the brush.
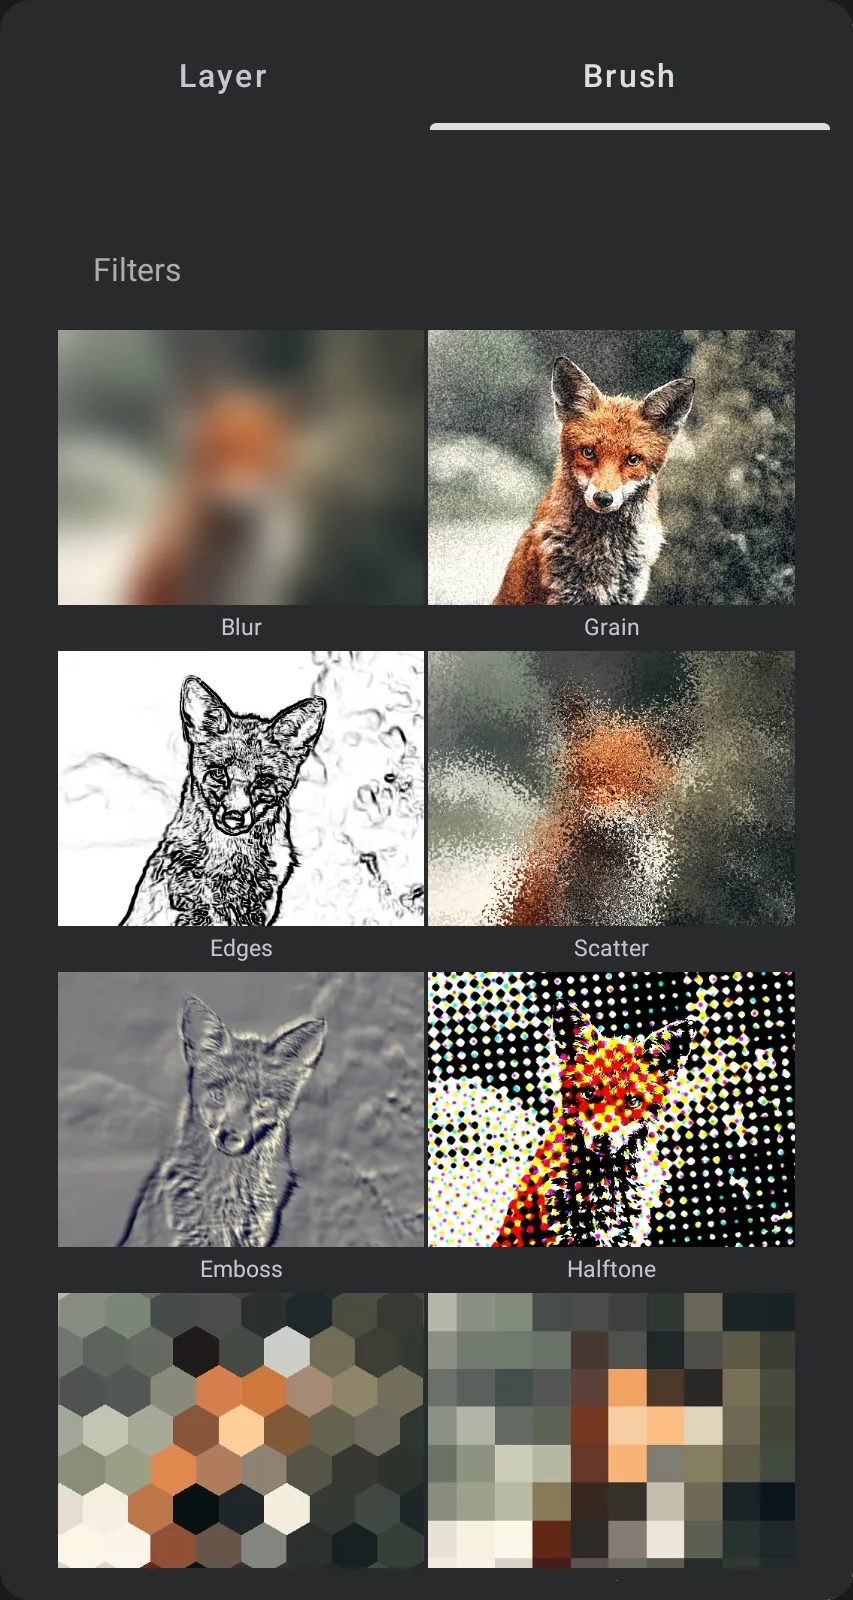
To apply filters or color adjustments to the brush, use the Filters section on the Special tab of the Brush Editor:
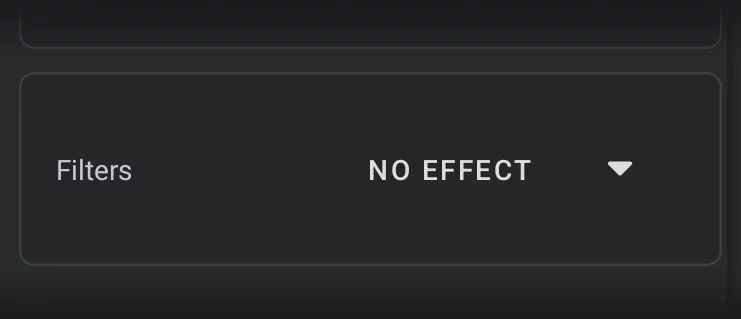
Tap the “NO EFFECT” button to open the filter selector panel.
Layer tab
Effects to be applied to the active layer.
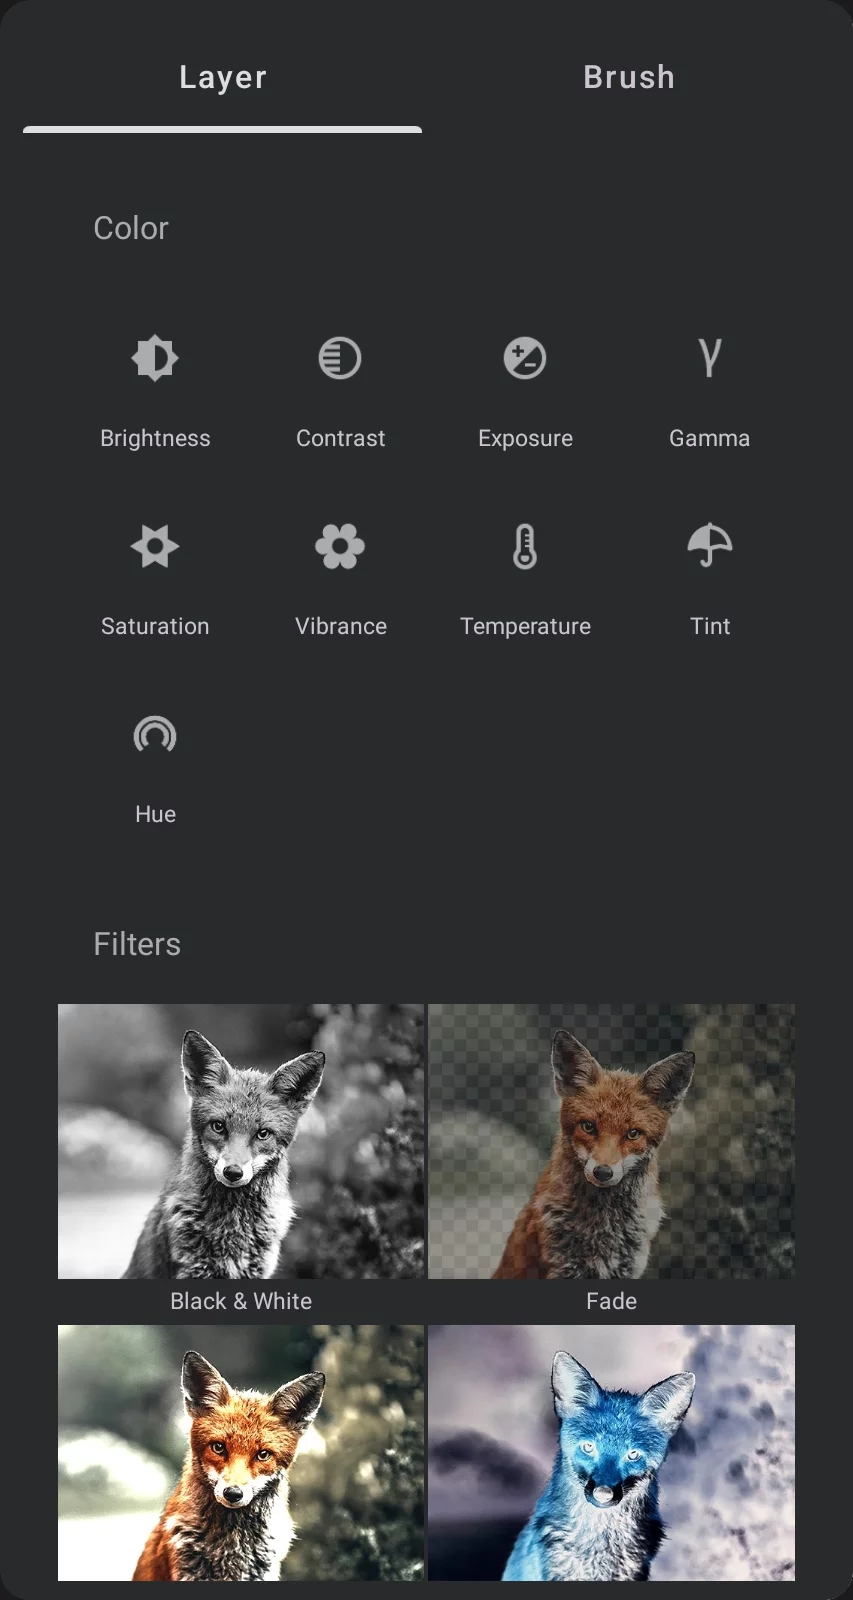
Color section
These adjustments are the same as Color Adjustment (Tools) used for entire layers or selections.
Filters section
These filters are the same as Filters (Tools) used for entire layers or selections.
Brush tab
Effects to be applied to the brush stroke itself
Filters
These filters are the same as Filters (Tools) used for entire layers or selections.
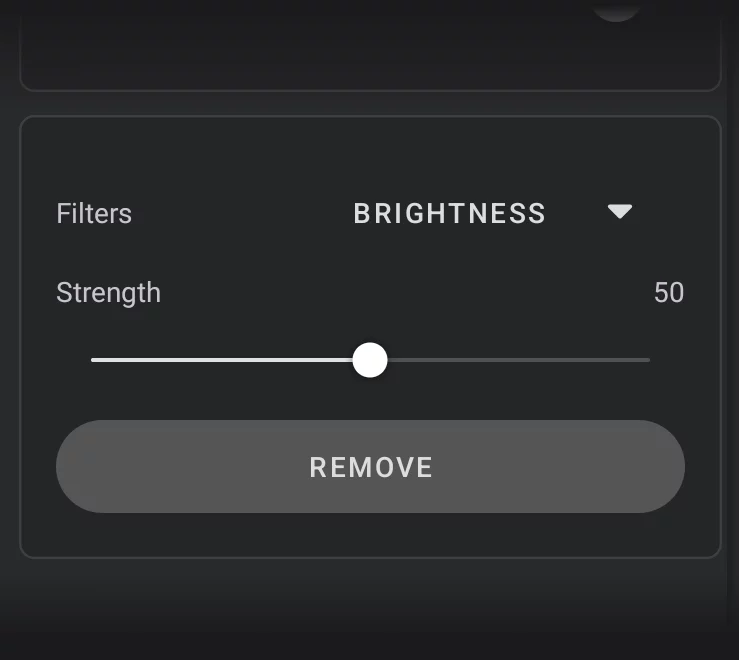
When a filter or color adjustment has been chosen, the Filters section will display the name of the filter and its basic controls:
List of the filters and adjustments
tap to select one of the special effects.
Strength (-100 — +100)
— (when an effect is active) controls the main parameter of current effect. Usually zero is neutral. This slider is accessible on the main toolbar too (as a circular slider in place of the color indicator).
Remove (button)
(when an effect is active) removes current effect from the brush.
![]()
Remember to confirm the changes in the Brush Editor to have the effect actually applied to the brush.
When the current brush has a filter of a color adjustment applied, the current color indicator on the main toolbar gets replaced with a circular slider for the filter strength parameter. This also shows you the current strength of the applied filter.
Strength circular slider
Slide up or down to adjust the strength of the effect. You will see the real-time preview of the effect applied to the entire layer.